Adding and managing cost indexes
Cost indexes track changes in the cost of goods and services over time. The cost indexes created in Sage Estimating (cloud), formerly Sage BidMatrix, can be used in the Bid Insights to adjust previous subcontractor bids based on the market fluctuations, regional cost differences, and other factors.
You have the option to create custom cost indexes, use the existing CPI All or CPI Regional cost indexes, or combine both options.
Before you begin
Log in to Sage Estimating (cloud) as an Admin or Librarian.
To create a custom cost index:
- Select Libraries > Cost Indexes.
-
Select Add Cost Index.
-
In the Add Cost Index dialog, select Custom.
-
Enter a Name.
-
If the index factors are relative to each other through time, select the corresponding option.
-
Add one or more dimensions as follows:
-
Select one of the options:
-
To add location related dimensions, select Add Location.
-
To add work breakdown-related dimensions, select Add Work Breakdown.
-
To add project attributes as dimensions, select Add Attribute.
-
-
Select the dimension from the dropdown.
-
Select OK.
-
-
Select OK.
To add the Consumer Price Index (CPI):
- Select Libraries > Cost Indexes.
-
Select Add Cost Index.
-
In the Add Cost Index dialog, select CPI All or CPI Regional.
-
Update the Name as needed.
-
Select OK.
To add items to a cost index:
- Select Libraries > Cost Indexes.
-
Select the cost index.
The CPI All and CPI Regional cost indexes with a lock icon ( ) next to them indicate that items cannot be added manually. To update these indexes, create a copy and modify it as needed.
 -
Hover over the row number where you want the new item to be added, either above or below, and select Insert Item.
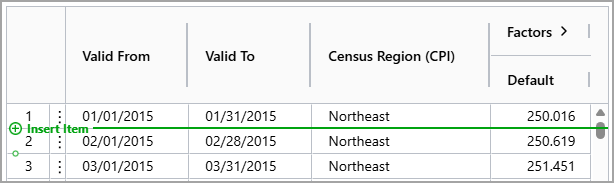
-
Enter the Valid From and To dates, enter the default Factor, and enter the dimension values.
Repeat this step for all the required periods and dimensions.
To import items to a custom cost index:
- Select Libraries > Cost Indexes.
-
Select the custom cost index.
-
Select Import and upload the file from your drive.
The file must be in .xslx format, and its layout must match that of the index.
To delete an item from a custom cost index:
- Select Libraries > Cost Indexes.
-
Select the custom cost index.
-
Select the ellipsis icon
 next to the appropriate item.
 -
Select Delete.
To export a cost index in .xlsx format:
- Select Libraries > Cost Indexes.
-
Select the cost index.
-
Select Export.
To copy a cost index:
- Select Libraries > Cost Indexes.
- Select the ellipsis icon
 next to the appropriate cost index.
 - Select Copy.
To delete a cost index:
- Select Libraries > Cost Indexes.
- Select the ellipsis icon next to the appropriate cost index.
- Select Delete.
- In the dialog, select Yes to confirm your action.
To reorder the cost indexes:
- Select Libraries > Cost Indexes.
-
Select the drag and drop icon (
 ) next to the appropriate item to move it higher or lower in the list.